How To Replace A Washing Machine Hose with a No-Burst Braided Stainless Steel Hose
In the Fullerton area, most residents rely heavily on their automobiles, correct? Whether to get to work or the grocery store, driving is a part of everyday life. To maintain safety and versatility, Fullerton residents prioritize taking care of their vehicles by getting an oil change. It’s like feeding yourself. Oil changes are a part of life. The only difference is that this “feeding” is only required every 3,000 miles or every 3 months.
Just like you change your oil, and understand the importance of an oil change, you need to remember to change your washer hose. I know it hides behind your bulky washer. It always seems “fine” if the hose is out of site and out of mind, but there can be severe repercussions if the hose contiunues to be neglected. Forget the hurricane coming to town. What about your washer? Imagine floating furniture, a sopping flatscreen, drenched walls, and a ruined floor. (Is that your dog on top of the entertainment center trying to keep dry?) Fact: Neglected washing machine hoses are the number one cause for home water damage.

Why Your Washing Machine Hose Needs To Be Changed Every 5 Years
Washing machines come with a reinforced black rubber hose. The fabric reinforcement melded into the rubber rots after about 5 years.
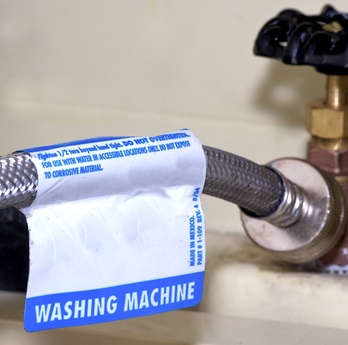
No-Burst Braided Stainless Steel Hoses
These stainless steel hoses are less likely to break than their rubber counterparts, but are not burst-proof like the label says. Despite them not living fully up to their unrealistic name (i.e. a hose you never need to change because it will never burst), these hoses are still the better alternative to their rubber counterparts. The hoses are much more flexible, stronger, and often times, the connections have better seals. Stainless steal hoses cost only a bit more than the rubber ones, but the investment is worth it. Think of it like a small price to pay for a whole lot of extra insurance.
Installing Your Braided Stainless Steel Hose
- Turn the water supply to the washer off. Set the washing machine to the filling cycle to make sure the water is off.
- Unplug the washing machine and pull it from the wall about a foot. When you look behind the machine, besides for all the nastiness that has accumulated there (the loads of dust and grime which you can clean later), there will be three hoses- a thin hot water hose, a thin cold water hose, and a large drain hose.
- Depending upon the amount of slack you have, pull the washing machine further out to work behind it. Disclaimer: Do not let the drain hose fall to the floor because it will have water in it!
- Put a water bucket underneath the hoses. Make a cut in the middle of the hoses and drain them into the bucket.
- Cut the rubber hose off the connectors to make removing the connectors easier.
- Remove the connectors. If the connecotrs are rusted, you can spray some WD-40 to help with removal. Otherwise, a pair of pliers or a monkey wrench should work fine to finish the removal job.
- Putting on new hoses is as easy as pie. Check that the rubber washer is completely inside the hose connector.
- Put the connector fully into the faucet.
- Turn it with your pliers, until you feel a strong resistance.
- Repeat the procedure with the 4 remaining connections.
- Turn the water on and check if there are any leaks.
- When pushing your machine back to the wall, be careful the hoses are not squished or kinked.
And voila! Magnifique! You are done!
If you are having trouble with this process, call your Fullerton plumber for any questions you may have, or to come and have a look if you perceive any other washer hookup problems.


